


Painting your oak cabinets white and adding a glaze involves a process of cleaning, sanding, priming, painting, and finally applying the glaze to add depth. This DIY project can modernize your kitchen for about $200-400 and typically takes 3-5 days, saving you thousands of dollars when compared to a full replacement.
Table Of Content
- What Is White Glaze on Oak Cabinets?
- Who Should Try This Project?
- Why Choose White Paint with Glaze Over Plain White?
- Materials You’ll Need
- Complete Step-by-Step Process
- Troubleshooting Common Problems
- Cost Comparison: DIY vs Professional vs Replacement
- Maintenance for Long-Lasting Results
- Expected Results and ROI (Return on Investment)
- Final Thoughts: Transform Your Space Today
What Is White Glaze on Oak Cabinets?
Applying a white glaze to oak cabinets is a two-part process: first, you paint the cabinets white, and then you apply a thin, semi-transparent layer of glaze over the top. The glaze is a special formula designed to settle into the wood’s natural grain, grooves, and details. This technique enhances the texture of the wood, creating a soft, custom style that can range from antique to modern. It adds a level of depth and character that plain white paint alone cannot achieve, giving your cabinets a high-end, custom look on a DIY budget.
You can create several effects with glaze :
- Antique look: A darker glaze settles into recesses to create vintage charm.
- Subtle highlight: A light-colored glaze provides gentle contrast.
- Rustic style: Applying a heavy layer of glaze can produce a farmhouse appeal.
- Modern twist: Minimal glaze application keeps the lines clean and contemporary.
Who Should Try This Project?
This project is an excellent choice for several types of people:
- Homeowners on a Budget: You can achieve professional-looking results for under $400, saving 70-80% compared to the cost of new cabinets without hiring expensive contractors.
- DIY Fans: It’s a fun and creative project that allows you to learn new painting skills and customize the final look to your exact style.
- New Home Fixers: As a starter renovation project, it offers a big visual impact for a manageable amount of effort and can build your confidence for larger projects in the future.
Why Choose White Paint with Glaze Over Plain White?
| Plain White Paint | White Paint + Glaze |
|---|---|
| Flat, one-dimensional look | Rich depth and texture |
| Shows every fingerprint | Hides minor imperfections |
| Can look stark or cold | Warm, inviting appearance |
| Basic DIY project | Professional-looking results |
Materials You’ll Need
Essential Supplies
| Item | Purpose | Estimated Cost |
|---|---|---|
| Deglosser/TSP cleaner | Remove grease and grime | $8-12 |
| Sandpaper (220 grit) | Surface preparation | $10-15 |
| Bonding primer | Base for paint adhesion | $25-35 |
| White semi-gloss paint | Main cabinet color | $30-50 |
| Antiquing glaze | Creates depth effect | $15-25 |
| Quality brushes | Smooth application | $15-20 |
| Foam rollers | Even coverage | $8-12 |
| Drop cloths | Protect surfaces | $10-15 |
| Total Cost | $121-184 |
Optional Tools for Better Results
- Paint sprayer: $0-200
- Sanding block: $5-8
- Tack cloth: $3-5
- Paint tray and liners: $8-12
Complete Step-by-Step Process
Step 1: Remove and Prep Everything (Day 1)
- Time needed: 4-6 hours
- Begin by taking photos of your cabinets to remember where everything goes. Remove all doors and drawers, labeling each with painter’s tape. Next, remove all hardware like handles and hinges. Set up a dedicated workspace in a garage or spare room and give all surfaces a thorough cleaning with a deglosser or TSP solution.
- Pro tip: Keep all hardware in labeled bags to avoid losing any pieces.
Step 2: Sand for Perfect Adhesion (Day 1-2)
- Time needed: 6-8 hours total
- Using 220-grit sandpaper, lightly scuff all surfaces you plan to paint. The goal is not to remove the old finish, but to eliminate the glossy sheen so the primer can stick. Once sanding is complete, wipe everything with a tack cloth and vacuum any remaining dust from crevices.
- Common mistake: Over-sanding can remove the wood details that the glaze is meant to highlight.
Step 3: Prime Everything (Day 2)
- Time needed: 4-6 hours application + drying time
- Using a high-quality bonding primer is crucial for durability. Apply a thin, even coat to the cabinet boxes first, followed by the doors and drawers. Allow the primer to dry completely, which typically takes about 24 hours. This step is essential; without primer, your paint will likely chip and peel within months.
Step 4: Apply Base White Paint (Day 3-4)
- Time needed: 6-8 hours total application
- For durability, use a semi-gloss white paint. Apply the first coat using a brush for detailed areas and a foam roller for flat surfaces, always brushing with the wood grain. To avoid lap marks, maintain a wet edge as you work. Let the first coat dry for at least 4-6 hours before applying a second thin coat for full, even coverage.
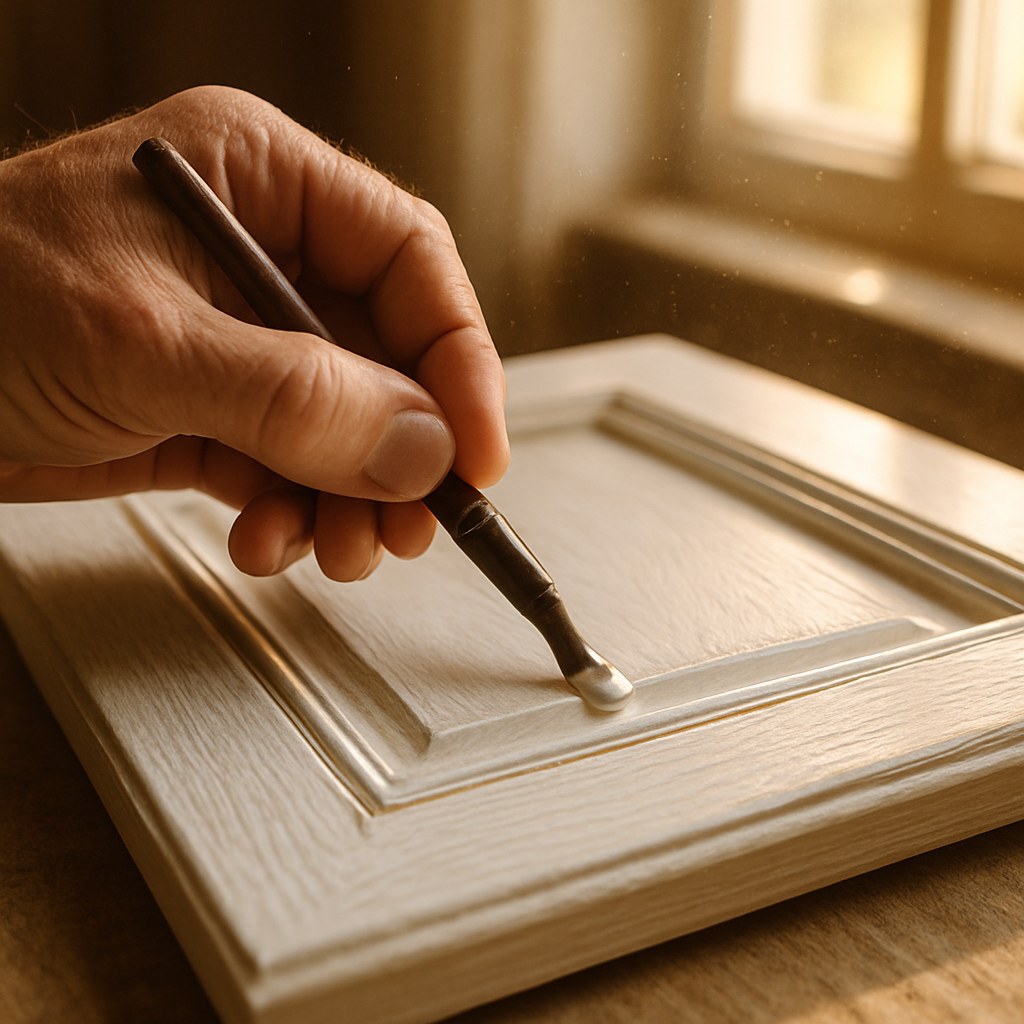
Step 5: Create Magic with Glaze (Day 5)
- Time needed: 4-6 hours
- Mix the glaze according to the package instructions and test your application technique on an inconspicuous area, like the inside of a cabinet door. Working on one door at a time, apply the glaze with a brush or a clean rag, pushing it into the wood grain and panel details. Wipe away the excess with a clean cloth until you achieve your desired look. Let each piece dry before handling.
Step 6: Reassemble Your Kitchen (Day 5-6)
- Time needed: 2-4 hours
- Allow everything to cure for at least 24 hours after glazing. Using your reference photos, reinstall the hinges and hang the doors, adjusting them as needed so they close properly. Finally, install the handles and knobs before cleaning up your workspace.
Troubleshooting Common Problems
- Paint Won’t Stick: This is likely caused by improper cleaning or sanding. You’ll need to strip the problem area, re-clean, re-sand, and re-prime.
- Glaze Looks Blotchy: This often happens if the glaze was applied over paint that wasn’t fully dry. Let the surface cure for 48 hours, sand it lightly, and re-apply the glaze.
- Brush Marks Show: This can be caused by using a low-quality brush or applying paint too thickly. To fix it, sand the area smooth, use a quality brush, and apply thin coats.
- Paint Chips Easily: The most common cause is skipping the primer step or using the wrong type. Always use a bonding primer designed for slick surfaces.
Cost Comparison: DIY vs Professional vs Replacement
| Option | Material Cost | Labor Cost | Total Cost | Time Investment |
|---|---|---|---|---|
| DIY Paint & Glaze | $150-250 | $0 | $150-250 | 3-5 days |
| Professional Paint | $300-500 | $1,200-2,500 | $1,500-3,000 | 2-3 days |
| Cabinet Refacing | $2,000-4,000 | $2,000-4,000 | $4,000-8,000 | 3-5 days |
| New Cabinets | $3,000-8,000 | $2,000-7,000 | $5,000-15,000 | 1-2 weeks |
Maintenance for Long-Lasting Results
- Daily Care: Clean up spills immediately with a soft cloth. Avoid harsh chemicals and abrasive sponges.
- Monthly Maintenance: Wipe cabinets down with mild soap and water, then dry them thoroughly. Check for any loose hardware.
- Yearly Touch-ups: You may need to sand and touch up high-wear areas and re-glaze corners that get heavy use.
Expected Results and ROI (Return on Investment)
Your kitchen cabinets will have a fresh, modern look immediately after the project is complete. The paint will fully cure and become durable after about one month, and with proper care, should still look great after a year. After 5-8 years, you may need to perform light touch-ups in high-wear areas. This DIY investment of $150-$250 can add an estimated $2,000-$5,000 to your home’s value, representing a significant return on investment.
Final Thoughts: Transform Your Space Today
Painting and glazing your oak cabinets is about more than just saving money—it’s about creating a kitchen you love. The warm, custom appearance of glazed cabinets makes your space feel expensive and thoughtfully designed. In less than a week, you can achieve a kitchen transformation that will make you proud.


No Comment! Be the first one.